Applying Tags
During the process of reviewing messages, it is common to use Tags to classify messages by topics. For example, it is possible to create the Tags “Marketing”, “Support” and “Bot” to classify messages related to these topics.
The simplest way to create a tag was presented in Post Review. Note that when you click Create Tag next to a post, that Tag will be assigned only to the message where it was created. The tag will be available for other messages, but it will not be automatically assigned.
To automatically assign a Tag to posts, you must follow these steps:
-
Filter posts as normal, as described in Post Filtering.
Attention: it is possible to use any of the available filters, except the Tags, Author Tags, Reviewers and Facebook Pages filters. If it is necessary to use any of these filters to perform the automation, it will be necessary to use a Classification Rule and/or the Mass Classification tool. -
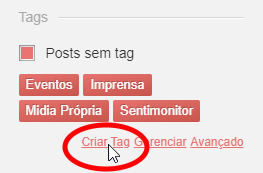
Click Create Tag, inside the Filters area.
-
Enter the title of the Tag.
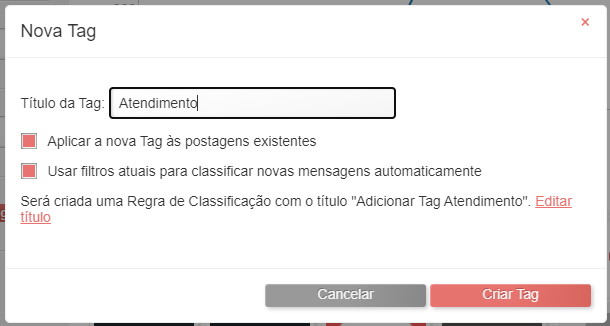
When creating a Tag in this way, you can select the following options:
a. The Apply the new Tag to existing posts: after creating the Tag, the platform will apply it to all messages that meet the selected filters. This will be done through a Mass Classification. Note that if this option is enabled, the creation of the Tag may take a few minutes, according to the volume of messages that can be filtered. The entire monitoring lifetime to apply the tag will be considered;
b. Use current filters to automatically classify new messages: after creating the Tag, a Classification Rule will be created, which will apply the Tag to new messages that meet the selected filter. If you choose to create a Classification Rule, the name of the rule can be modified by clicking Edit title. This rule can be edited or deleted by navigating to the list of monitoring rules.
-
Click the Create Tag button, and confirm the changes.